Using The Stack in App Inventor 2 - Part 2
A blog post by Jill Lovas, Front End Developer
Welcome back to the second part to the Burger Master App Inventor 2 tutorial! If you missed Part 1, make sure to check it out HERE.
Last time, we set up our stack variables and the basic setup of the game and burger toppings. Now we are going to set up the customer, the submit button, and finish the game. Let’s get to it!
Setting up the Customer
The player needs to meet the customer’s demands, or it wouldn’t be a game. The customer wants a specific type of burger that only they could dream up. We need to write something that will assign random colors to the buttons to represent this. We also want to be able to track those values in a way that can be compared with the burger the player builds.
We will need a few procedures for this task.
First, we will start writing a procedure called setCustomerWant. I made the decision to make sure burgers had buns on both ends, but that is up to you. I did so by setting the color of the button and then I pushed the associated color number onto the stack. I associated the colors as 0 = bun, 1 = burger, 2 = condiments, … up to 5, which totals up to 6 values to represent the toppings. This matches the same number association as the toppings from the previous tutorial part, so when I want to compare the player’s burger with the wanted burger, I can do so easily. This is what the procedure looks like with just the ends of the bun being completed:
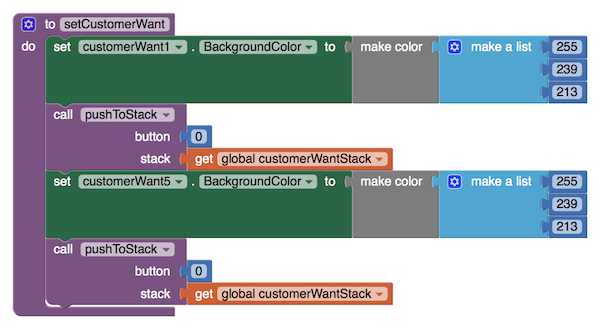
The setCustomerWant procedure
You may be wondering about how the colors are being made here. In App Inventor, a color can be made using a list of 3 or 4 values. The first value represents the Red value, the second represents the Green value, and the third represents the Blue value. The colors combine to make one unique color. There is also a fourth value for the alpha value/opaqueness, but it is not required. You can read more about it here. In order to match the color value I set for the bun in the designer, I used this chart to find matching hexadecimal and RGB values. All I did was paste the hexadecimal value into the designer for the bun button and then used the RGB code to create it programmatically here.
The customer isn’t going to just want two empty buns, so we need to write two more procedures to help set up the randomization of what the customer wants. First we will write a procedure called getRandomColor which will return a color variable. This procedure sets the button representing what the customer wants a random color by using the ‘random integer’ block and a local variable to temporarily store the random value. The range on this block is set from 1 to 5 because I already added the bun code in earlier and I don’t want customers to add any more buns to the burger. Another local variable is used for returning the color selected. It is assigned black as a color at first but it doesn’t really matter what color it starts with since it will always be reassigned to one of the 5 topping colors once the procedure finishes.
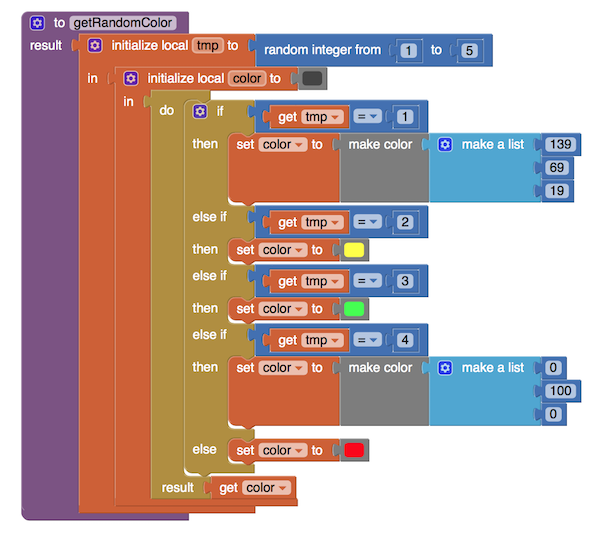
The getRandomColor procedure
The second procedure will get the number associated with the color so we can push it onto the customerWantStack. We need to write another procedure which will decipher the color and return the number it is associated with. The procedure below is similar to getRandomColor but instead gets the number associated with the color. You could also do this by creating a global variable and track the tmp value made in getRandomColor, since you cannot easily return two values from a procedure.
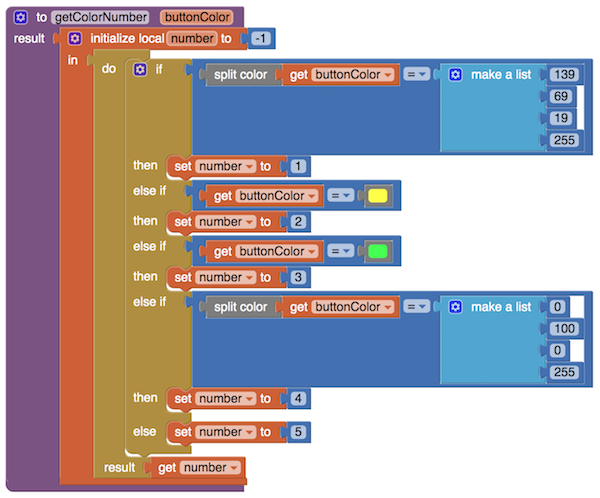
The getColorNumber procedure
After setting up all these procedures, we can add them to setCustomerWant. The procedure should look like this now:
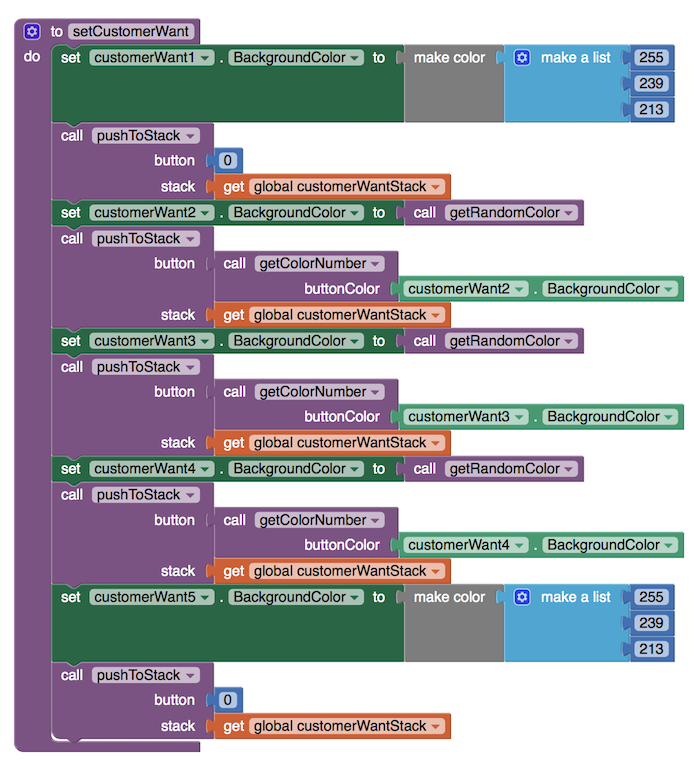
The finished setCustomerWant procedure
Add a call to getCustomerWant to the top of the setUpGame procedure, and the burger the customer wants will now be set up and ready for the player to match when the screen loads!
Submitting a Burger to the Customer
Players can build fancy burgers that the customer wants, now how do they give it to them? A submit button will work for this. When the submitBurgerButton is clicked, we want to compare the player’s burger with the customer’s desired burger. If they match, the score should go up. If they do not, we want the player’s strikes to go down, and if they are all used up, then the player should enter a game over state and have to start over. This is the structure that I just described, and we will go into the details of the additional procedures we will write in a moment:
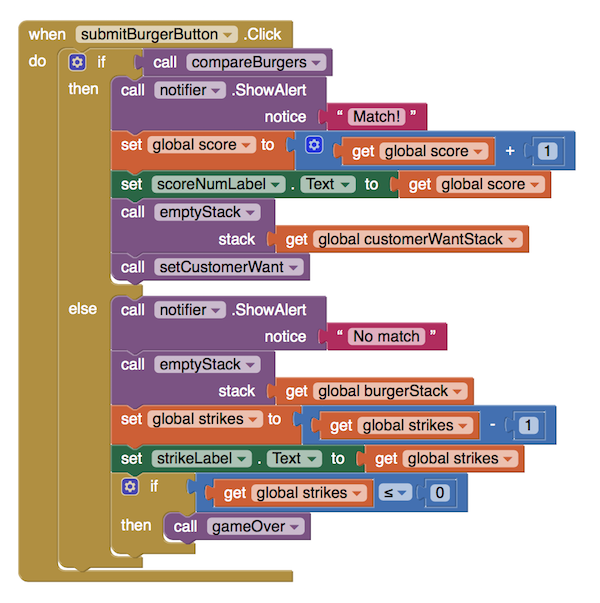
The submitBurgerButton when clicked component
Let’s start by tackling the procedure compareBurgers. When the submit burger button is pressed, we do an if-check on the compareBurgers procedure, so we need to be sure we are returning true or false by the time this procedure finishes. We want to make some local variables to track the information because it makes it easier to understand when reading and it prevents the variables from being altered elsewhere in the code (which could happen since a lot of our variables are global in scope). We will use
- areBurgersTheSame: set true or false based on if the player’s burger is the same as the customer’s wanted burger
- loopLength: how many toppings the player has put into their burger (it could be less than 5, but the customer always wants 5, so this will be the controller of the loop)
- tempCustomerWantStack: this is a copy of the customerWantStack. We want to use a copy instead of the real thing because we are popping the two stacks in comparison with each other in the upcoming code. If the player does not have a matching burger, the customer’s wanted burger should still be fully intact so the player can try matching it again. If this were using the actual customerWantStack, then the customer’s burger would be half-built for the next attempt to match it, which doesn’t make any sense.
The above should look like this for now:

The compareBurgers procedure
Onto the actual checking part. There’s a few cases we need to be aware of. The player could submit:
- an empty burger stack
- A correct burger
- An incorrect burger
For the first option, we know if the burger stack is empty by checking its length. If it’s length is 0, we know it couldn’t possibly match the customer’s wanted burger. For the next two options, we will check the burger toppings against one another. This requires a while loop block that checks if the loopLength variable is greater than 0. If the two burgers differ at any point, we will set the loopLength to -1 and exit the loop. When comparing the two burgers’ toppings, we can create two local variables and pop the toppings from their respected stacks into them. We check if the two are the same, and if they are, we keep going and reduce the loopLength by 1.
We don’t want to set areBurgersTheSame to true within the loop because we want all the toppings to be true, not just single matches. In consideration of that, we will only check if the variables are not the same. If they are not, we have no reason to continue looping. Only once we are out of the loop should we check if the loopLength is not -1 and set areBurgersTheSame to true. The procedure should look like this in its finished form:
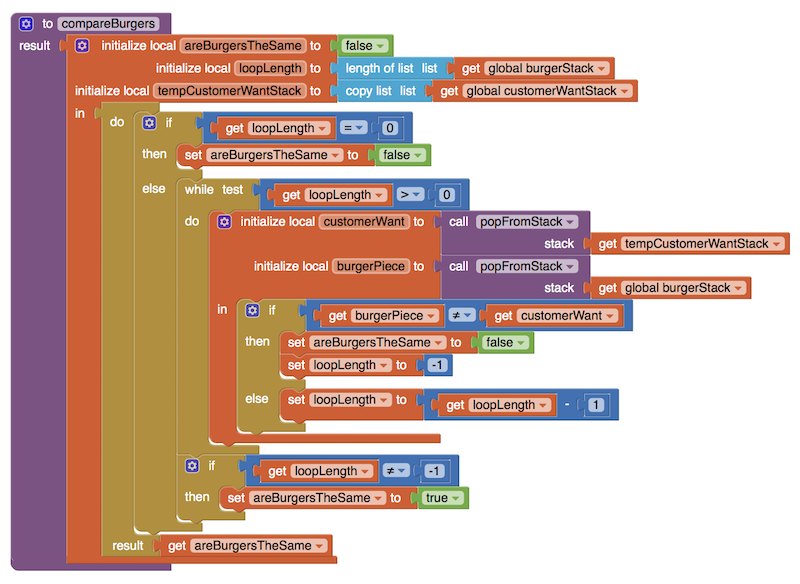
The completed compareBurgers procedure
That concludes the compareBurgers procedure!
Another customer’s burger needs should appear so the player is making a brand new burger for the next customer. If we want to do that, we need to first clear the customerWantStack, then refill it again with our setCustomerWant procedure call. Luckily this is fairly simple with the procedures we have already written. Create a procedure called emptyStack and from within it, call popFromStack for each item in the inputted stack. It should look like this:

The emptyStack procedure
This is a very simple procedure that will empty out a given stack. Make sure to call setCustomerWant immediately after this procedure is called so the player knows what burger they are making next! If the player did not match the customer’s wanted burger, we want to call emptyStack on the burgerStack because the loop may have ended early when comparing, leaving some toppings still on the burger.
Next up, we need to handle when the player uses up all their strikes. We want the stop the timer, set the player’s score to 0, and let them know that the game is over. We want to have a procedure like this one:
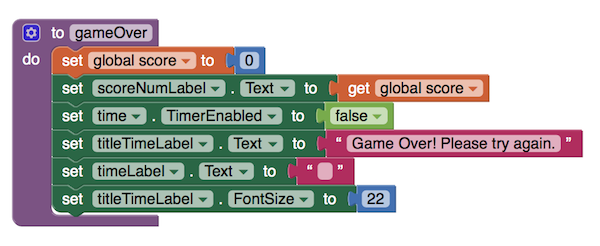
The gameOver procedure
Not only that, we want to make sure the player cannot do anything when they have reached game over. Create another procedure called disableEverything and add a call to it as the last block in the gameOver procedure. In this procedure, we mostly want to disable all the buttons and empty the stacks. We can disable the functionality of a button with the .enabled blocks, and make them look visually disabled by setting the background color to a grey color.
Also in this procedure, it would be a good idea to enable the ‘play again’ button. We will create one more procedure call called enablePlayAgainButton that simply sets the submitBurgerButton to say ‘play again’ and the variable gameDone to true. All together, those procedures look like this:
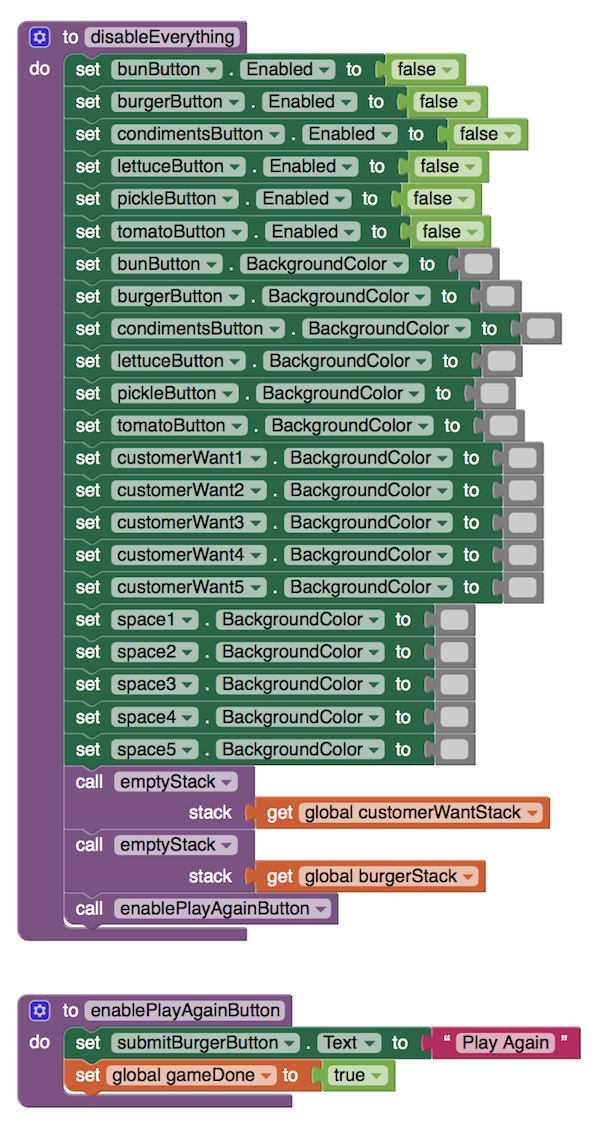
The disableEverything and enablePlayAgainButton procedures
Because there’s very little screen real estate to allow for another button, the submit burger button is being repurposed into the play again button. The submitBurgerButton can be updated to reflect this change like so:
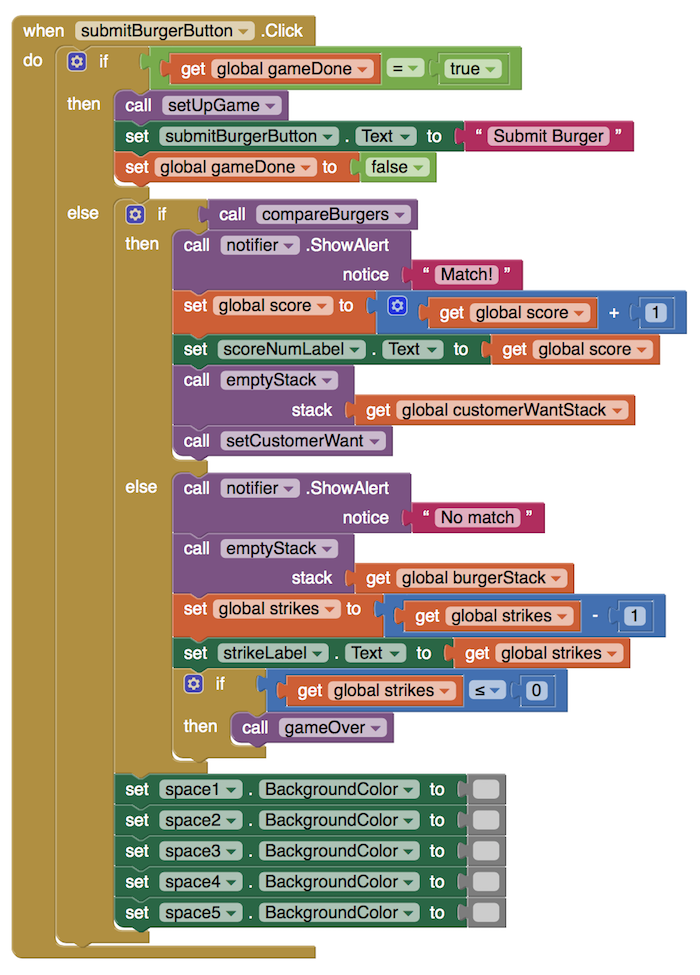
The completed submitBurgerButton when clicked component
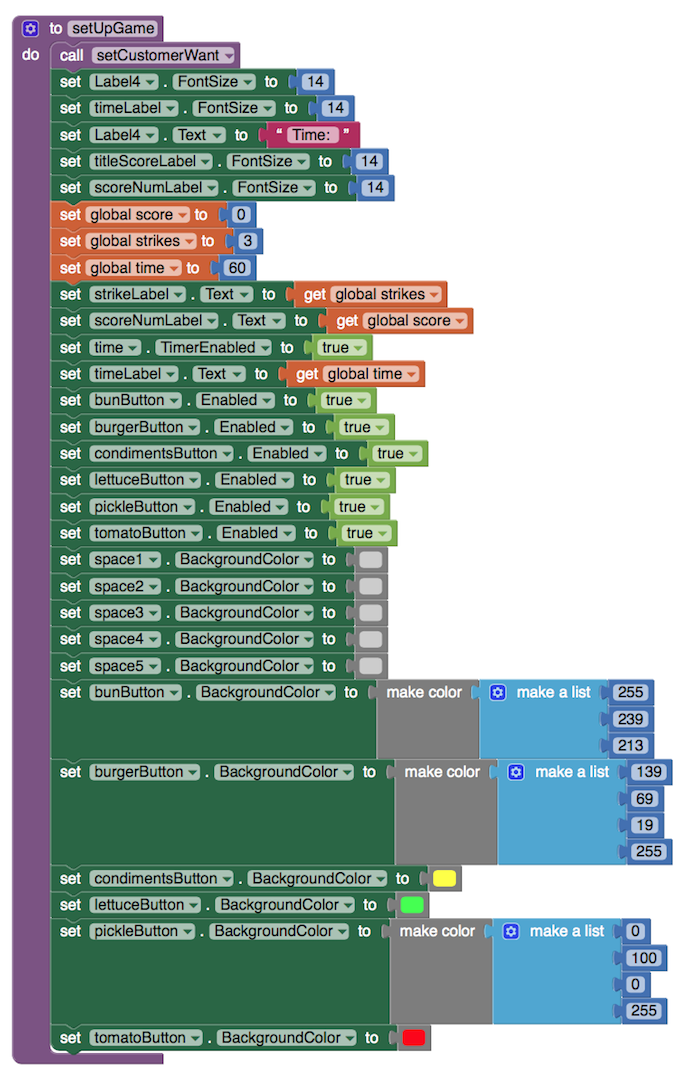
When the repurposed submit button is pressed, we now want to re-setup the game, just like in the blocks above. We call the setUpGame procedure like we did when we first loaded the screen. I just added some things to change the game’s state back into the way it originally started, like reverting the labels back to what they originally said and their original size, as well as resetting the colors of the buttons to their original colors. We cleared their colors when the game finished, so we need to reassign the colors again.
Finishing the Game
The game can finish in three different ways.
- The player runs out of time while playing and achieves some score value.
- The player runs out of time with a score value of 0
- The player uses up all their strikes
We already handled the last way in the previous section, so now we need to handle the first two ways, which revolve around the timer running out. The first way is the only winning state. There isn’t a lot of space in the app to show if a player has won or lost, so make use of the score and time labels instead of adding in additional parts. If the player runs out of time with a positive score, the score will get big. If the player loses by running out of time with a score of 0, the timer space grows and to tells them ‘Game over! Please try again’, which is set when we call the gameOver procedure. These blocks are all added inside the timer component to do so:
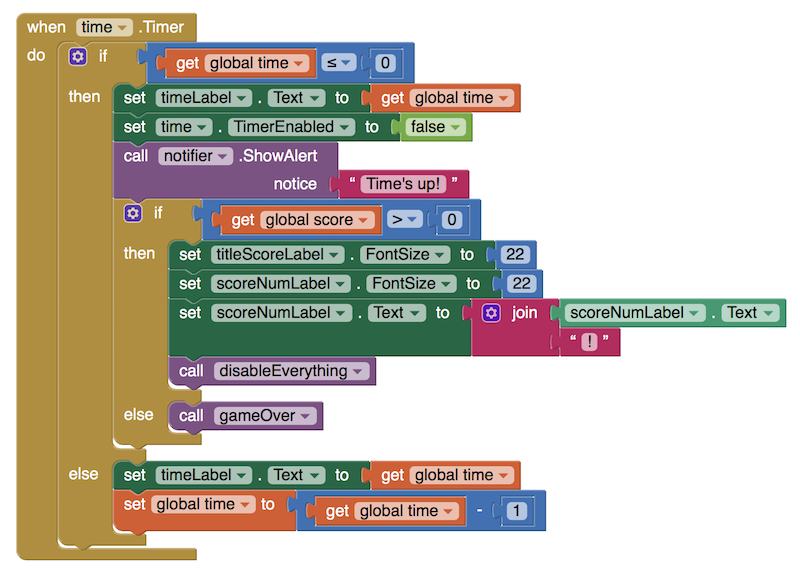
The timer with code to handle when the time runs out
With the code from both parts of this tutorial, you should have a BurgerMaster game! You have now used stacks to create a basic game, along with useful tools such as procedures, if-statements, loops, and more. If you have any problems, feel free to look at the completed project here.