Using the Stack in App Inventor 2 - Part 1
A blog post by Jill Lovas, Front End Developer
Recently I was involved in Technovation, a worldwide initiative to introduce girls to programming and business entrepreneurship. This was the first time Technovation branched out to Edmonton to reach the youth in our area and I volunteered with them as a technical mentor. It was a very interesting and exciting opportunity to see the students build a project together in such a short period of time and with very little prior knowledge of coding. It was equally exciting to see girls taking an interest in the field of computing science. Just having women try programming is worthwhile because it gives women knowledge of the inner mechanisms of technology in an otherwise male-dominated field. It also opens up a possible hobby or career choice that may have never been considered. There’s a lot of creativity to be found in programming and you can flex your problem-solving muscles at the same time!
I found mentoring for this initiative beneficial as well. It helped me to recognize my knowledge of programming by sharing what I knew and it strengthened my understanding of certain aspects of the skill. Women and minorities in my field, including myself, often suffer from Imposter Syndrome, which means that they undermine their knowledge and think that their success is simply through chance or luck and not from the hard work they have put into their efforts. Though this feeling is still around, I think mentoring was helpful in ensuring me that I have what it takes to stand strong in my field. I want a student’s first impression of the computing science field to be one that is not run by internal pressure to be ‘good’ but by their own imagination. Do not worry about how you measure up to others and have fun with what you’re doing.
Technovation encouraged the use of a web app called App Inventor 2 for making the apps. App Inventor 2 (I will call it App Inventor from now on, but we are still talking about the second release) is capable of making fully functional apps for Android devices. It covers a surprisingly large amount of app functionality that you can find in developer software like Android Studio. You can take pictures, use geographical location information, access APIs and the web, store data and access it remotely, the list goes on. It is a very useful learning tool as it provides the complex functionality of written programming languages in the easy-to-understand form of block-style programming. Anyone can learn how to program with this tool and they can make worthwhile projects while doing so.
App Inventor provides a lot of components that are core to coding, such as if-statements, loops, local and global variables, and lists. It is not very broad in its variety of data structures (which I understand; this is a learning tool and you can’t possibly include all of them), but I’d like to talk about one in particular, being the stack. What is a stack, and why would I want to use one?
The Stack
A stack is similar to a list in App Inventor, but more restricted. Stacks behave much like a stack of plates, as they are First In Last Out structures (FILO). The plate you place on top will be the first one you take off the pile. It’s literally a stack! In programming, the action of putting something onto a stack is called ‘pushing’ and when you want to take something off, it is called ‘popping’. Unlike the lists in App Inventor, you do not access index positions within the stack - in our analogy, it would not make sense to move the lower plates before moving the one on top, unless you want to make a mess.
Stacks have a variety of uses:
- Undoing and redoing actions, or hitting the back button
- Games involving restricting player actions - maybe they cannot reach older customers in a restaurant game unless they handle the new ones to prevent them from quickly leaving.
- Can be used to limit the amount of something (ie, I can’t fill this truck until it has been emptied first)
- Algorithmic uses such as for sorting and recursion
There’s also a stack within computers that helps run programs. The internal stack works in the same memory space as something called the heap and both grow towards each other as memory is used. If the error ‘java.lang.StackOverFlowError’ occurs, then it means you have exceeded the number of items you can put on the stack. If the stack’s space is exceeded, it is called a stack overflow. This often happens due to recursion, or repetitively self-calling procedure, in your program. The recursive procedure is not ending the call to itself and continues to do so forever, overflowing the stack with stored procedure calls. The App Inventor emulator by itself does not have a lot of memory so it cannot handle a lot of recursive calls. This could happen if one implements the Quicksort algorithm using something with a lot of data to sort. The algorithm uses recursion to split the data and thus it cannot store its recursive split procedure enough times in memory to complete the sort.
I wanted to make a tutorial on how one could use the stack for a game in App Inventor. For learning purposes, I included a simple example that demonstrates how a stack works in its most simple form on the first screen of this app before navigating to the game. This tutorial is an intermediate level, using procedures, clock, colors, buttons, if-statements, while loops, and lists. Feel free to use the stack code or anything else that seems useful to you in your own App Inventor project. At the end of the tutorial I will link the final project that you can look at if you get lost. Now, let’s start building a burger-making app!
Burger Master Game
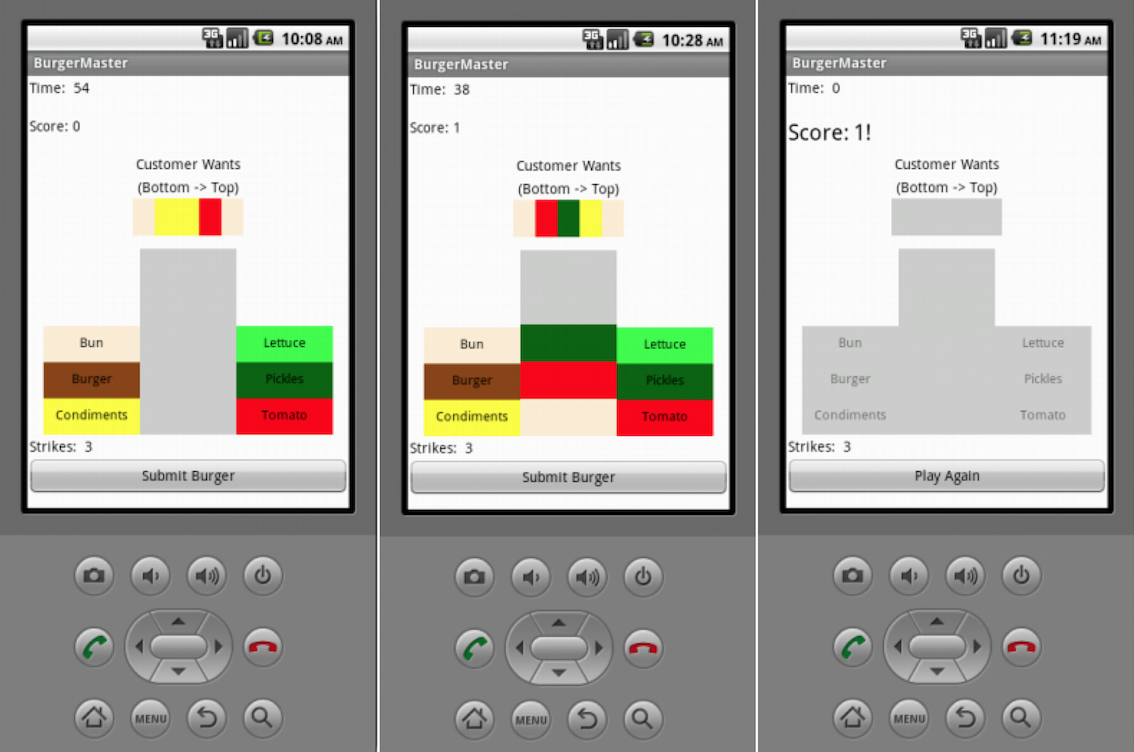
Screens from the finished Burger Master app
In this game, you are a burger master with needy customers who want a burger made their way, just for them. They specify the type of burger they want, and you need to make it for them with the various toppings. Complete as many customers as you can before the timer runs out, and don’t mess up too many times or you will lose the game!
The User Interface
The first thing we’ll need to do is set up the user interface (UI). I made mine using a lot of horizontal and vertical layouts for style/readability, but do it as you like. The customer’s ‘wants’ are being represented with buttons, as well as the stack. I added some labels to indicate the player’s score and the time remaining and the number of strikes they have until losing. I put in some text indicating the direction the customer is describing their hamburger; if you want you may add proper graphic design to make this (and the rest of the app) easier to understand, but this tutorial focuses on the functionality. Don’t forget to also add a clock (and optionally, a notifier) to the project.
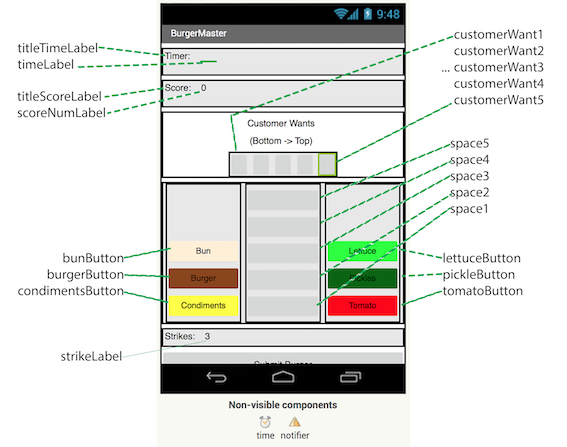
The names of the components on the UI screen - these are pointing at user interface components, not layout components
The player will build the burger by clicking on the topping they want to add to the burger, and that topping will appear in the middle area from bottom to top. They can add up to 5 toppings. If they want to remove the topping they added, they need to click on it, but they can only remove it if it is on the top. If they made a mistake in the middle, they will need to remove the other toppings on top of the mistake first.
Next, you’re going to need to set up some global variables to keep track of a few things.
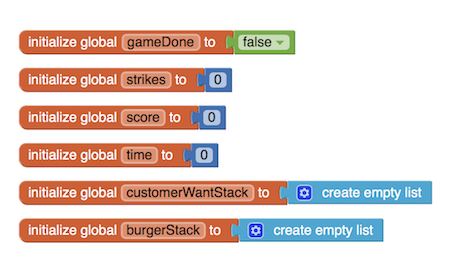
The global variables we will need for this game
- gameDone - this variable keeps track of when the game is finished. I use this as a way to repurpose my ‘submit burger’ button into a ‘play again’ button later since there isn’t a lot of space on the screen to add another one.
- strikes - this variable keeps track of how many chances the player has to build the wrong burger.
- score - this variable will keep track of how many times the player correctly submits a burger the customer wants.
- time - this is for keeping track of the time the user has left before the game is over.
- customerWantStack - this is an empty list that we will fill with a procedure call once the screen has initialized. It is going to be the stack that represents the randomly-generated burger the customer wants.
- burgerStack - this is the burger the player will be building. It will be tracked by an empty list as well which is filled as the player makes the hamburger.
Initial Game Setup
When the screen first loads, we want it to set up the game for the player. This is done in a procedure because we want to be able to re-setup the game later in the ‘play again’ button. When programming, it is good practice to write procedures that complete a single task. That way, they are reusable for different situations and easier to read later if you don’t remember why you wrote them. There’s a lot of procedures in this tutorial, so be ready!
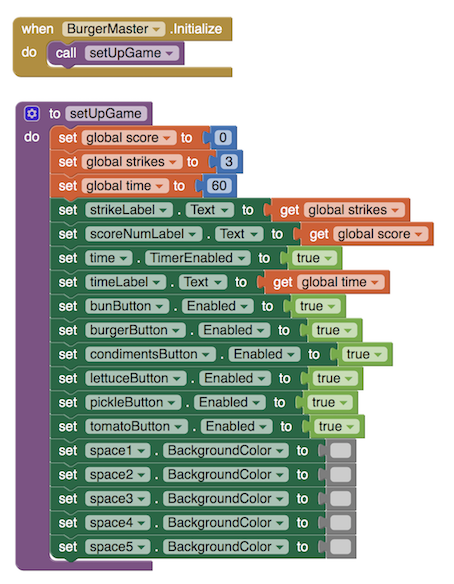
The burgerMaster initialize component block and the setUpGame procedure
In the setup procedure so far, all the burger-space buttons’ background colors are set to grey. This is done because, when App Inventor sets a color on a button, it no longer looks like a default button. We are changing the buttons’ colors throughout this game, so we might as well start it looking the same way it will look after it has been assigned a color. We also enable the timer so it will begin a 1-second countdown as time goes by. Here is the rest of the code for the timer.
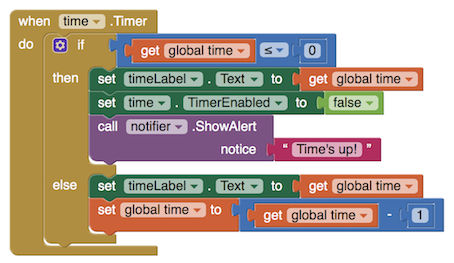
The blocks in the timer component
Setting Up the Burger Stack
The player needs to make burgers for the customer out of common burger toppings. The burger will build from bottom to top, and if the player makes a mistake and wants to remove a part, they need to remove the other parts before putting the new part on. Just like in real life! In order to do this, we will use our burgerStack variable as a stack. We will first write code for the stack in a very general procedure, since we also have the variable customerWantStack and we want to reuse the code for it as well.

The pushToStack procedure
The pushToStack procedure will push variables to the stack, like what I described earlier. It takes two inputs: button and stack. The button will be a number we associate with a button’s color (0 = bun, 1 = burger, 2 = condiments, etc). The stack is which stack variable we want to push the button number onto. For both stacks, we are limiting the length, aka the pile, to 5 items. If the user tries to add more than that, they will be notified to remove some toppings from the burger before continuing and the topping they were trying to add will not be added. If they have less than 5 toppings on the burger stack, then we add them in the ‘topmost’ position, which is index 1 for App Inventor, or simply the first position if the stack is empty.
We also want to be able to take toppings off of the stack, so we should write the pop from stack as well.
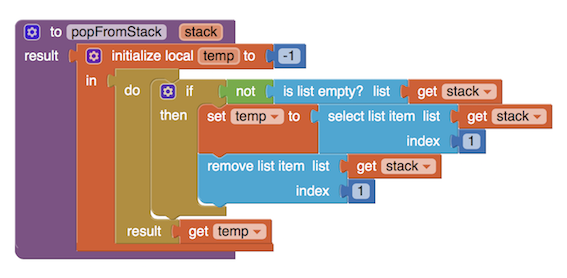
The popFromStack procedure
In this procedure, we again use the stack variable as input, and we will be returning the popped value to whomever called it. We make a temporary local variable, then check if the stack is empty. If it’s not, then we select the topmost item from the stack and assign it to the temporary variable, also removing it from the stack. The next item in the stack is now at index 1 for next time. We then return the temporary variable.
Great! We have basic stack functionality, which is key to making our game work. Now, call this procedure whenever you click one of the 6 burger toppings, like so:
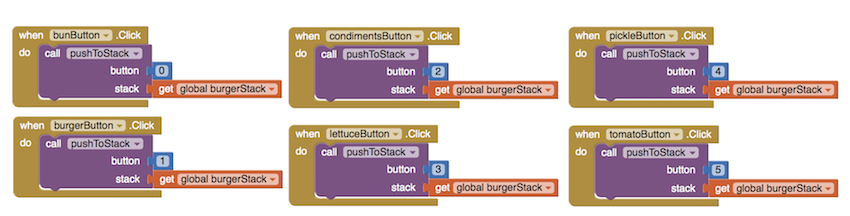
The blocks for each burger topping button when clicked
This moves the buttons onto the stack, but you won’t see much happening visually. You’ll need to add the visual effects to this with another procedure which we will creatively call visuallyPlaceBurgerPart.
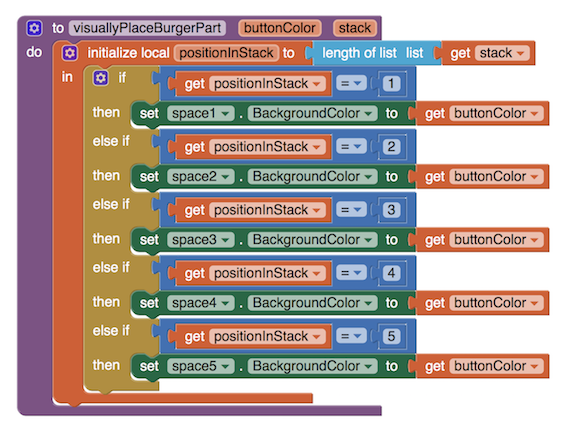
The visuallyPlaceBurgerPart procedure
In this procedure, we are using the stack’s length/pile amount to determine which button of our burger section to color the same as the pressed topping button. The inputs are buttonColor, which is the button’s backgroundColor value, and the stack is the stack we want this procedure to apply to (which will be the burgerStack in this case). We look at the burgerStack variable. If it is only one topping tall, we color in the first space in the burger pile. If it’s two toppings tall, we color in the second space, and so on. This will look like a burger in a very abstract way!
Add a call to visuallyPlaceBurgerPart to the toppings’ button click components after the pushToStack call. They should look like this now:

The blocks for each burger topping button when clicked with the additional visuallyPlaceBurgerPart procedure call
Now, when a topping button is clicked, it should visually add itself to the burger space. Excellent! But what if the player makes a mistake and wants to take some toppings off the burger? We want to allow the player to do this by clicking on the burger space that is colored in, but only allow the topping to be removed if the topping is the one on top of the pile/stack. We will handle this inside the space1, space2, space… buttons. In each burger space button we want to check two things:
- is the background color of my button a different color than its default color?
- is the topping the topmost item in the burger stack?
We require both of these points to be true, so use a logic ‘AND’ block. For the first point, check if the button’s backgroundColor is NOT the grey color we assigned it in the setup procedure. If it isn’t that color, then we know that it is part of the stack. For the next point, we simply check the length of the burgerStack list. If it matches the value of the space button (ie, space1 = 1, space2 = 2, etc), then we know that it is the topmost button. After that, set the button to the default grey color, since we are removing the topping from the stack. Next, call popFromStack. Use an ‘evaluate but ignore result’ block to ignore the return result since we do not need it anymore. The code for these buttons looks like this:
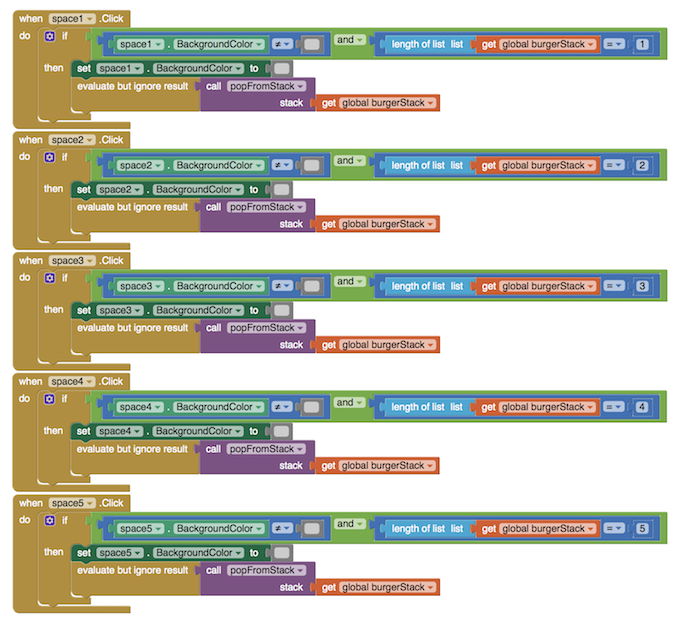
The blocks for each burger space button when clicked
Now when a topping button is clicked, the topping is added to the burger space, and if the player makes a mistake, they can easily undo it.
Click here for Part 2.